Latest documentation
The latest documentation can allways be found here:
https://github.com/fedtools/adfstoolkit
Federation Defaults
The "Federation Defaults" is files provided by SWAMID that helps you configure ADFS Toolkit for our federation.
They also contain the specific SWAMID-versions of the Entity Categories which includes Swedish-specific attributes like norEduPersonNIN, etc.
When using the cmdlet Get-ADFSTKFederationDefaults you should point to the following URL:
https://mds.swamid.se/md/SWAMID_FederationDefaults.zip
Like this:
Get-ADFSTkFederationDefaults -URL https://mds.swamid.se/md/SWAMID_FederationDefaults.zip -InstallDefaults
Below this heading the documentation is outdated!
Planning Your Installation
System Requirements
ADFS Toolkit must be installed on a Windows Server (your AD FS host) with:
- Microsoft AD FS v3 or higher
- Local administrator privileges to schedule privileged jobs
- AD FS administrator-level permissions to run PowerShell commands
- Acceptance of the security considerations running PowerShell retrieved from Microsoft’s PowerShellgallery.com
While not a firm requirement, we strongly suggest a test AD FS environment to perform the installation prior to installing in production. You should be aware that after installation, you will see a few thousand trusts displayed within the administration toolset, AD FS-Microsoft Management Console (MMC).
Minimum Server OS
Windows Server 2012 R2 or newer is the minimal level of OS supported. You should also be current on latest OS and security patch/updates provided by Microsoft.
Minimum PowerShell Version
ADFS Toolkit uses Microsoft’s PowerShell with Windows Management Framework (WMF) 5.1. To see if your host is WMF5.1 ready, check the Microsoft Compatibility Matrix.
To quickly see which version of PowerShell you have, open a PowerShell window or PowerShell ISE window and enter $PSVersionTable. If you do not see version 5.1, you will need to update your environment first.
WMF 5.1 can be downloaded from here: https://docs.microsoft.com/en-us/PowerShell/wmf/5.1/installconfigure
ADFS Toolkit will not proceed until your environment has been upgraded to at least this PowerShell version.
Installation Procedure
Downloading the ADFS Toolkit uses Microsoft’s PowerShellGallery.com service as the official primary distribution channel of ADFS Toolkit as a PowerShell Module. This allows us to rely on Microsoft’s approach to managing distribution and updated PowerShell Modules for the lifecycle of ADFS Toolkit.
To install ADFS Toolkit you will need to:
- Visit https://PowerShellgallery.com and follow the instructions to install the latest PowerShellGet Module from PowerShellGallery
- Alter your Execution Policy for PowerShell scripts on your AD FS Server
Required Security Conditions
All installation steps are assumed to be performed by a user with both Local Administrator level access and AD FS Administrator access. SWAMID is in the process of acquiring a certificate for the securely deliver of the ADFS Toolkit through PowerShellGallery as a known trusted source. Until the certification process is in place, ADFS Toolkit requires the ability to run AD FS modules from unsigned origins.
To prepare your system for the ADFS Toolkit Execution policy settings issue the following PowerShell command to relax the policy.
Install the Module
The module is installed by issuing the command:
PowerShell

Install-Module –name ADFSToolkit
If this is your first time installing items from PowerShell Gallery, you may see this:

Answer yes to install the required NuGet provider
You may also see this:

Either update the PowerShell Gallery to be trusted or answer ‘Y’ to proceed.
Once connected, the Module will be installed in the default PowerShell home of:
C:\Program Files\WindowsPowerShell\Modules\ADFSToolkit\[version #]
Bootstrapping Trust Explained
AD FS does no trust verification on the data it loads other than having a valid HTTPS endpoint. This minimal validation alone is insufficient for AD FS to participate in a Federation’s circle of trust. ADFS Toolkit helps elevate or ‘bootstrap’ AD FS as a trusted endpoint in the federation by:
- Verifying the veracity of the key being used by the SHA256 fingerprint that you provide
- Based on this key, you can trust that the aggregate has not changed since being cryptographically signed with that key
ADFS Toolkit processes help ensure that the content is valid and safe for AD FS to load and that it originated from an authority that you trust: SWAMID.
The validation approach ADFS Toolkit uses is based on the user supplying the fingerprint of the certificate that they want to trust.
The SHA256 fingerprint of the SWAMID certificate to be used is:
A6785A37C9C90C25AD5F1F6922EF767BC97867673AAF4F8BEAA1A76DA3A8E585
This fingerprint can be verified manually by:
- Fetching SWAMID’s public portion of our certificate that we use to sign our aggregates here: http://mds.swamid.se/md/md-signer2.crt
Using the following OpenSSL command to find the fingerprint of the certificate you just downloaded:
Configuring ADFS Toolkit
To create the configuration file for SWAMID metadata, issue these commands:
PowerShell

New-ADFSTkConfiguration
The command will prompt you for the following answers (see table below) and results in a configuration file created on disk. Optionally, a scheduled job to hourly process the aggregate can be created. The scheduled job is disabled by default.
| Question | Answer |
|---|---|
| Metadata Aggregate | http://mds.swamid.se/md/swamid-2.0.xml |
| Certificate Fingerprint | A6785A37C9C90C25AD5F1F6922EF767BC97867673AAF4F8BEAA1A76DA3A8E585 |
| Metadata Prefix |
|
| Institution Name | Your Organization’s official name |
| Country Name | Sweden |
| Country Code | SE |
| Institution Domain |
|
| Short Name for Your Institution | The short name representation of your institution that you commonly use, e.g. Linköpings universitet is known as LiU. |
| External DNS Name of Your AD FS Infrastructure | The Fully Qualified Domain Name (FQDN) of your AD FS instance |
When the configuration is complete, the resulting XML configuration file will be found in the “/config” folder in the PowerShell Module’s base directory. It is this configuration file that will be processed in a subsequent PowerShell command to load (or synchronize) metadata aggregate into AD FS.
PowerShell Hint: Use this to see ADFS Toolkit’s Module base directory

(Get-Module –Name ADFSToolkit).ModuleBase
In addition, a new directory will be created on disk here: C:\ADFS Toolkit\. This directory contains the Task Scheduler job sync-ADFSTkAggregates.ps1. This permits one or more aggregates to be loaded (or re-loaded) with a single command.
Subsequent runs of “New-ADFSTkConfiguration” command in PowerShell will append a command to load that aggregate in the sync-ADFSTkAggregates.ps1 PowerShell script.
Importing the metadata through ADFS Toolkit
Once the configuration has been created, the ADFS Toolkit directory will contain the PowerShell script <sync-ADFSTkAggregates.ps1> used to load the aggregate. To import the metadata, simply execute the sync-ADFSTkAggregates.ps1 command and observe the output on the screen or via the Event Viewer in the ADFS Toolkit event log.
This command is designed to run repeatedly, synchronizing the aggregate and keeping it up-to-date. The first execution of the command may take more than one hour to synchronize all entities, and will run at about 100 entities per minute. Subsequent runs will perform more quickly in comparison, as the records have already been created and are only updated if a change is detected.
Note: You will notice some errors or warnings in the PowerShell Console window. This is expected and you can review details in the Event Viewer to determine severity or if any action needs to be taken.
In Case of a Problem
If for any reason you want to revert or remove all the trusts created from loading the aggregate, we have provided a command within the ADFS Toolkit called unpublish-ADFSTkAggregates to do just that. If this command is invoked without any arguments, it will assume the default prefix of ‘ADFSTk’. The metadataPrefix is the value you set for each of the entities when they are loaded and is stored in the configuration file. You do not need to include the prefix separator of a colon “:” in the prefix definition.
This command will select all entities with this prefix and delete them. Please take special care using this command, as it is a non-reversible, destructive action.
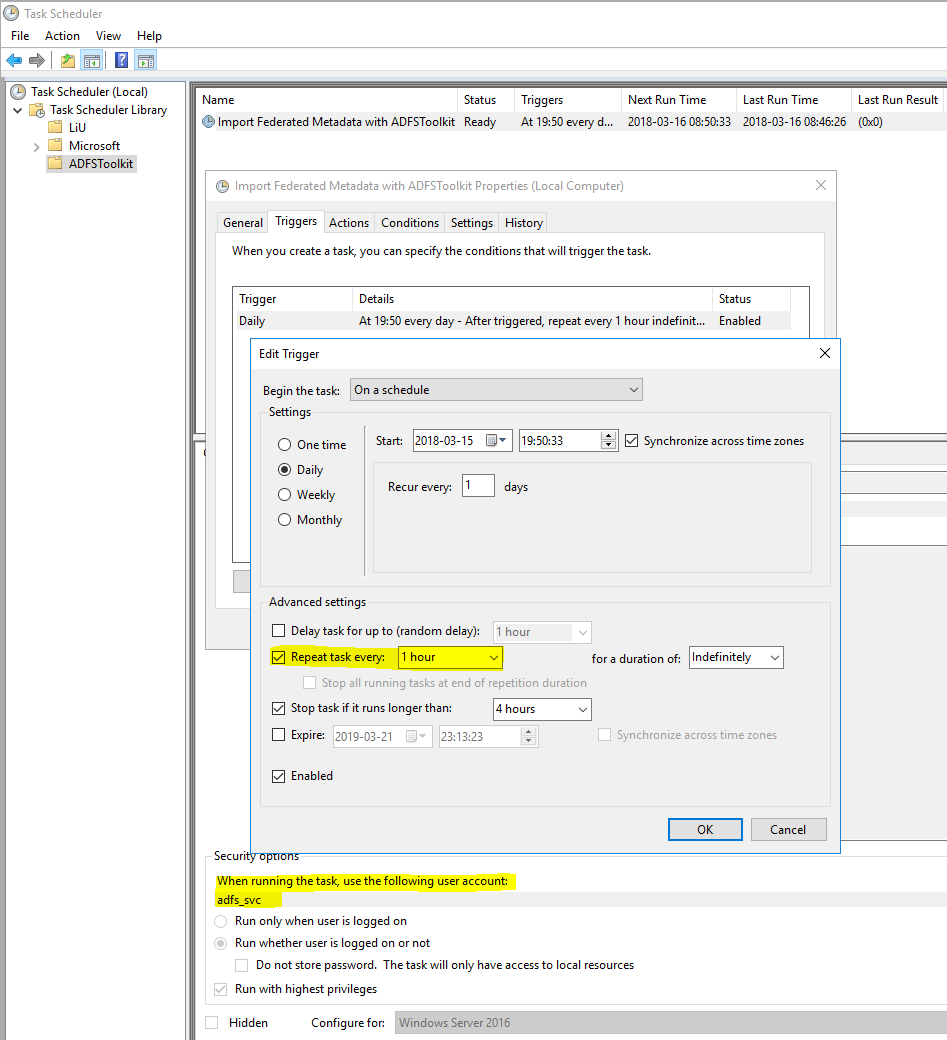
Scheduling sync-ADFSTkAggregates to Run
ADFS Toolkit automatically creates a scheduled job with a default status of “Disabled”, allowing you to make edits to the configuration settings and to test them before enabling the automatically scheduled operation.
An hourly cycle is recommended and should be activated by the administrator to ensure your AD FS system is always synchronized with the SWAMID metadata.
We also recommend that a service account is used to run the scheduled task.
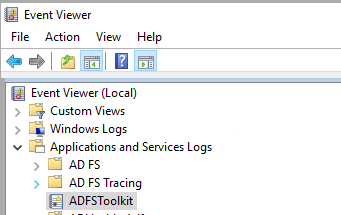
Reviewing Runtime Logs
ADFS Toolkit uses the Microsoft Windows Event Log infrastructure for application logging, available in the Event Viewer. Each record seen on the command line through manual execution is added to the logs and follows Microsoft recommendations for log rotation.
Configuring manual Attribute Release
ADFS Toolkit externalizes attribute release settings per Relying Party (RP) away from AD FS by housing the attribute release policies in a single PowerShell script file (/config/getADFSTkManualSPSettings.ps1).
This allows administrators to refresh the attribute release for a given RP on each execution of the PowerShell script. It also provides AD FS administrators a convenient way to centrally manage attribute release rather than trying to find an element in the AD FS Administration Console, which may list thousands of RPs.
This script contains a number of commented out attribute release sets that can be copied and uncommented to be put into effect. Lines beginning with the pound ‘#’ character denote a comment and will not execute if they contain code or commands.
The PowerShell script file to edit for releasing attributes is:
PowerShell

~<install_home>/config/get-ADFSTkManualSPSettings.ps1
ADFS Toolkit Operational Behaviour
ADFS Toolkit (PowerShell Module) is designed for one installation per machine. Attempting to install multiple instances of ADFS Toolkit on a single host with different versions is possible, but it is not recommended or supported.
The modular design of ADFS Toolkit promotes code simplification and re-use, i.e. the settings and configurations can be re-used regardless of how many aggregates are loaded. Operational decisions and considerations should take into account the following best practices:
- Edits of the PowerShell script ADFSTkManualSPSettings.ps1 need to result in correct PowerShell syntax and function.
- This script is used at runtime across all scheduled jobs or installations. If you edit and save the script file in an incomplete state, it will affect the operation of the job and result in possible failure or incomplete operation, both of which may have an impact on the stability of your production service.
- Before making changes to the script, you should always make a backup copy so that you can revert to the last known “steady state” if needed.
- Using a test environment outside of and separate from production during development and testing is strongly encouraged. Once edits have been fully verified, you can copy the script to your production environment and execute it in confidence.
- IMPORTANT: When you have completed editing ADFSTkManualSPSettings.ps1, you MUST reissue the Import-Module ADFS Toolkit command to capture the changes you have just created. This will also validate your PowerShell settings if there is a problem (i.e. fails to reload the module).
ADFS Toolkit’s Lifecycle Management
ADFS Toolkit’s Module uses the PowerShell Gallery tool command ‘Update-Module’ to manage delivery of updates. Sites using ADFS Toolkit are strongly encouraged to have a test system to review changes between versions. In cases where there is no test system, a snapshot/backup of their environment is strongly recommended. Note that some updates may require removing the cache files and run again completely to apply new features. Updates that require this will be flagged as such in the release notes. It is up to the site operator to determine when to do this and to allow for sufficient time to recalculate the new improved settings. ADFS Toolkit is designed to be idempotent in it’s operation – no matter how many times it is run, the resulting set will be the same which. The process to handle an update of ADFS Toolkit is to:
- Back up the C:\ADFS Toolkit directory
- Create a system snapshot/recovery point to return to
- Disable/suspend the ADFS Toolkit scheduled job
- Issue ‘Update-Module ADFSToolkit’
- When Update-Module is run, it will attempt to detect if there is a newer version available from PowerShellGallery.com and download it.
- Note that each module is downloaded into it’s own directory containing the version number of the script. ADFS Toolkit will not run properly with more than one version available so once the new version is confirmed on disk and available, we recommend moving the older version out of the PowerShell path so that only the latest version is available.
- Migrate existing configuration file and related cache files
- Is possible but if you hand edited the settings before, you need to re-apply the changes after migrating the configuration to the new format. There are two ways to do this
- Create the configuration as if they are new hand entering old answers
- Taking advantage of the pipelining features of New-ADFSTkConfiguration which can ingest your existing configuration and fetch many of the existing settings and bring them into the new format. You still need to inspect for any hand edits to be applied however.
- Is possible but if you hand edited the settings before, you need to re-apply the changes after migrating the configuration to the new format. There are two ways to do this
Example of pipelining your old configuration into the new is below:
"C:\ADFSToolkit\0.9.1.48\config\config.SWAMID.xml" | New-ADFSTkConfiguration
Once you have completed the review of the settings in configurations from the old configuration to the new configuration you can continue.
- Determining migrating caches from old to new is required.
- A sub-directory called ‘\cache’ in the live ADFS Toolkit home is used to track changes in metadata and save time re-calculating entity records in ADFS.
- It is possible to copy the cache from the old version to the new one to preserve current processing status and usually is possible.
- If there are major changes in how ADFS Toolkit processes records it may be worthwhile to permit ADFS Toolkit to recalculate everything again. This is done by NOT moving the old cache files over but the consequence is that all records will be refreshed and overwritten using the new logic. This may be desireable depending on the changes available in the new version.
- Migrate Site specific overrides
- The file c:\ADFS Toolkit\#.#.#.#\get-ADFSTkLocalManualSpSettings.ps1 contains all your local settings. Review the release notes and if no instructions are offered, simply copying the file from the old version to the new one is sufficient.
- If you do not copy this file into the newly created folder with the latest verion of ADFS Toolkit job, all your settings for existing entities will be removed.
- The file c:\ADFS Toolkit\#.#.#.#\get-ADFSTkLocalManualSpSettings.ps1 contains all your local settings. Review the release notes and if no instructions are offered, simply copying the file from the old version to the new one is sufficient.
- Resuming synchronization of Metadata
- Once manual operation has been validated, you have to manually edit the ADFS Toolkit scheduled job to point it to the new location of the sync-ADFSTkAggregates.ps1.
- The ADFS Toolkit job can be resumed in the Microsoft Job Scheduler and your migration considered complete.